3 Git Productivity Hacks
Most Ruby developers use Git for their version control system of choice. Git is a wonderful tool that can save you countless hours of lost productivity and makes collaborating with others a cinch. Git's distributed nature also allows devs to work anywhere with or without an internet connection without fear of losing work.
With all of the power that Git provides also comes some complexity. Newcomers to Git may find it's syntax somewhat unintuitive and clunky at first. Even Git power users often have to lookup lesser known Git subcommands and options from time to time. Git is similar to a Swiss Army knife in that it contains many useful tools, but can take some time to master or even find a use for them all.
The goal of this post it to describe some lesser known features of Git and how you can leverage these to improve your Git workflow.
Let's get started.
Checkout Last
One of the major features of Git is it's native support of branches. Git branches are lightweight and allow you to switch back and forth between different states of your codebase. This ability to quickly and easily create branches in Git does mean that a single Git repo can have many active branches at a given time. This means that you may constantly be switching to different branches several times a day.
The normal way to switch to a branch in Git is to refer to it by it's full name. For example:
mark at marks-mbp in ~/Projects/scoutapp_blog (master)
$ git checkout git_hacks

Switched to branch 'git_hacks'

mark at marks-mbp in ~/Projects/scoutapp_blog (git_hacks)
$
Having to remember and type the full branch name can be a chore especially for long branch names. Also, if you are mostly switching back and forth between the same two branches, say master and your feature branch, it would be helpful if there was a quicker way to navigate.
Enter -. Just like you can switch back to your previous directory in your shell by issuing the command cd -, Git allows you to switch back to your previous branch using checkout -.
mark at marks-mbp in ~/Projects/scoutapp_blog (git_hacks)
$ git checkout -

Switched to branch 'master'

mark at marks-mbp in ~/Projects/scoutapp_blog (master)
$
This tip alone could save you several minutes over the course of a work week, or hours a year.
Fancier Diffs
Much of your time when using Git will be spent viewing diffs. This is especially true when working on a team with several developers committing code daily. Out of the box, Git does a nice job of automatically coloring output in diffs to highlight added/removed sections of code. You can even adjust the colors that Git uses to display this information by tweaking your git config.
While this is a nice feature and is definitely an improvement over plain black and white diffs, tools such as Github's diff viewer can make Git's native format seem a little elementary.
Luckily, there are several tools that can help improve your diff viewing experience. One that I have starting using lately is diff-so-fancy. Diff-so-fancy is an external tool that can help beautify your Git diffs. After installing, simply pipe your Git diffs to diff-so-fancy for a much nicer diff view.
git diff --color | diff-so-fancy
Here's a comparison between the normal git diff vs piping the output to diff-so-fancy:
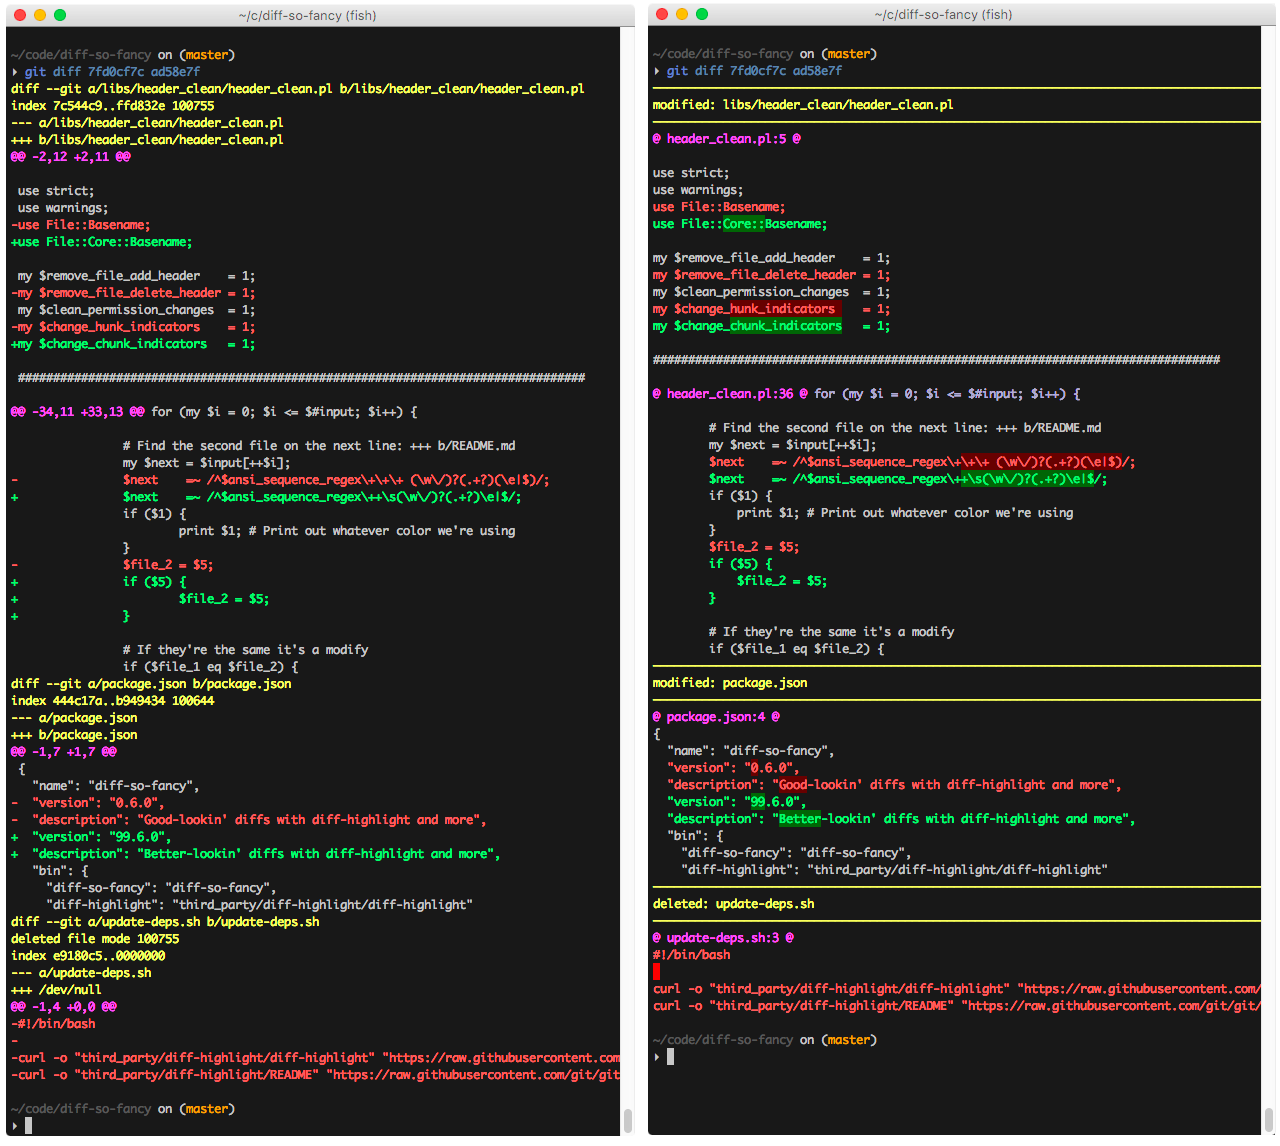
Besides improved highlighting, diff-so-fancy also removes preceding + or - characters which helps with copy-pasting from your diff, and also allows you to see which files have changed more easily with improved file headers.
You can even set diff-so-fancy to be your default diff parser in your git config by issuing:
git config --global pager.diff "diff-so-fancy | less --tabs=4 -RFX"
git config --global pager.show "diff-so-fancy | less --tabs=4 -RFX"
Bisect for easier bug fixing
This final Git tip is one for more 'advanced' Git users.
Have you ever found yourself trying to track down a bug in your codebase by looking through your commit history and diffs to see what changed recently? You know that your code was working as expected at some point, but then someone (or yourself) introduced a subtle bug and it is driving you mad trying to find the offending commit. Well Git bisect is here to help.
Bisect basically preforms a binary search on your commits to help you track down the bug. It works by having you set markers on your commit history for both known good and known bad commits, then picks a commit between the two and asks you whether the chosen commit is itself 'good' or 'bad'. Bisect then repeats this process until the offending commit is reached. It's probably easier to demonstrate this process with an example:
Suppose the bug is still present in your latest commit to your code base. You would first start bisecting by issuing the command:
$ git bisect start
You then tell Git that your current commit is in a known bad state:
$ git bisect bad
Next, you must tell Git about when your codebase was in a known good state, lets say you have a tag v1.1 where you know the bug is not present. You would issue the following:
$ git bisect good v1.1

Bisecting: 675 revisions left to test after this (roughly 10 steps)
You must now run your tests and tell Git if the bug exists at this commit by either issuing git bisect good or git bisect bad.
This process will repeat until there are no more commits to bisect, and Git will point you to the first 'bad' commit.
You can also tell Git to skip a commit by issuing the command git bisect skip if the current commit cannot be tested.
One important thing to note however is that for bisect to work to your advantage, each of your commits should resolve to your code being in a 'working state'. This means that if your tests fail to run because you committed with a syntax error, Git bisect will be of little help when it reaches this commit. This is another reason why you should always rebase or squash your 'work in progress' commits into a single final 'feature commit' when done developing a feature.
Wrap up
Hopefully these 3 tips will help you improve your git-fu and your workflow. Git is an amazing tool and I feel like I'm constantly learning about new things that it can do. There are several 'advanced' Git tutorials, courses and books available that can also help you level up your Git knowledge including:
- Atlassian - Advanced Git Tutorials
- Github - Advanced Git
- Codeschool - Git Real 2
- Pro Git - Second Edition
Thanks for reading. Please let me know of any Git tips that you find useful to your workflow in the comments!
Subscribe for more
Want more Ruby-related performance insights like this delivered monthly to your inbox? Just put your email into the form on the sidebar.
Mark Phelps is a Senior Software Engineer and Team Lead at Validic in Durham, NC.
He loves writing clean code and building great software, mostly in Ruby and Java. He also writes about software and startups on his blog.
He graduated in 2008 with a B.S. in Computer Science from Old Dominion University.
When he's not busy writing software, he can usually be found at home in Durham, NC drinking coffee or a good beer with his wife and two dogs (the dogs mostly drink water though).